EC2-Chapter-2: HOW to connect to a Linux instance through SSH using PuTTY, in 6 easy steps
In this chapter, we will learn using PuTTY to connect through SSH to a Linux instance on Amazon EC2.
We will connect to the Amazon Linux instance we created in EC2:Chapter-1
Prerequisites:
* You have an AWS login :) . Refer to Chapter1, otherwise.
* You have created a Linux instance, which is currently in RUNNING status. Refer to EC2:Chapter-1 otherwise.
* Your Linux instance can be SSHed from the current IP. Check your security group rule for SSH. Refer to EC2:Chapter-1 otherwise.
* You have entire PuTTY suite installed on your computer and have PuTTYgen available. If not, download from https://putty.org/
NOTE: PuTTY does NOT support the private key format (.pem) generated by EC2. We will use PuTTYgen to convert that private key to .ppk format, which PuTTy supports.
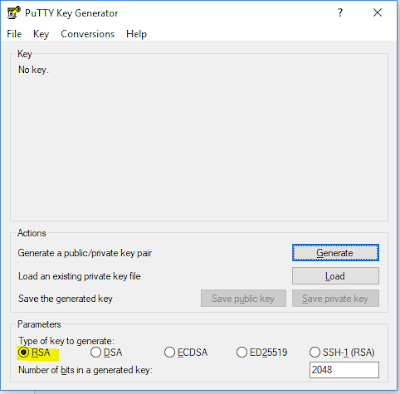
Step1: Start PuTTYgen from the start menu. Make sure the 'RSA' option is selected for 'Type of keys to generate' at the bottom of the wizard.
Step2: Click on Load button and choose the .pem file from EC2 that you saved earlier on your local machine while creating the instance. Click Open. Make sure you select 'All Files' as PuTTYgen looks only for formats it supports.
Step3: Once you see the 'success' dialog click on Save Private Key button and save it locally. You will need this private key every time you try to connect to your instance. Click Yes to save the private key with the same name given to the .pem file.
Step4: To connect using PuTTY you need the following two pieces of information. This can be collected from the EC2 dashboard.
1. Public DNS name.
IMPORTANT: This name changes every time the instance is restarted. So if you saved this name on an earlier PuTTY session it will not work after you stopped and started the instance in EC2.
2. User ID.
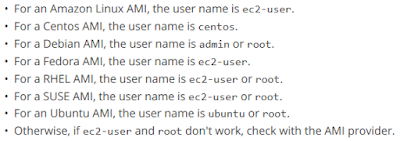
For Amazon Linux AMIs the user id is always ec2-user
So use the hostname ec2-user@public_dns_name
The user names for other distros can be referenced here:
Make sure you choose SSH as connection type and port 22.
Step5: In the Category pane, expand Connection, expand SSH and choose AUTH. Click Browse and select the .ppk private key you saved in step 3.
Step6: If this is the first time you are connecting to this instance, PuTTY asks you whether you trust it. Say Yes.
VOILA! You are connected. Check if what you want is pre-installed. :)


Comments
Post a Comment